Many Linux distributions bring along Bash as their standard shell. Thus, I have been using it for years. However, a couple of months ago I was made aware of Z shell (Zsh) and have been using ever it since on a daily basis. In this time, I have come to love it and enjoy working with it very much. Thus, I want to outline some of my key findings and learnings in this post.
Zsh
Compared to Bash, Zsh offers a wide variate of different advantages. Those that I have learned to appreciate most are the following:
Ease of Use
Zsh is much more powerful than Bash when it comes to tab completion. A simple but power example is the fact that it will tab complete names (e.g. folder or file names) case insensitively. Even further, it will even tab correct typos. This works extremely well, increasing productivity significantly.
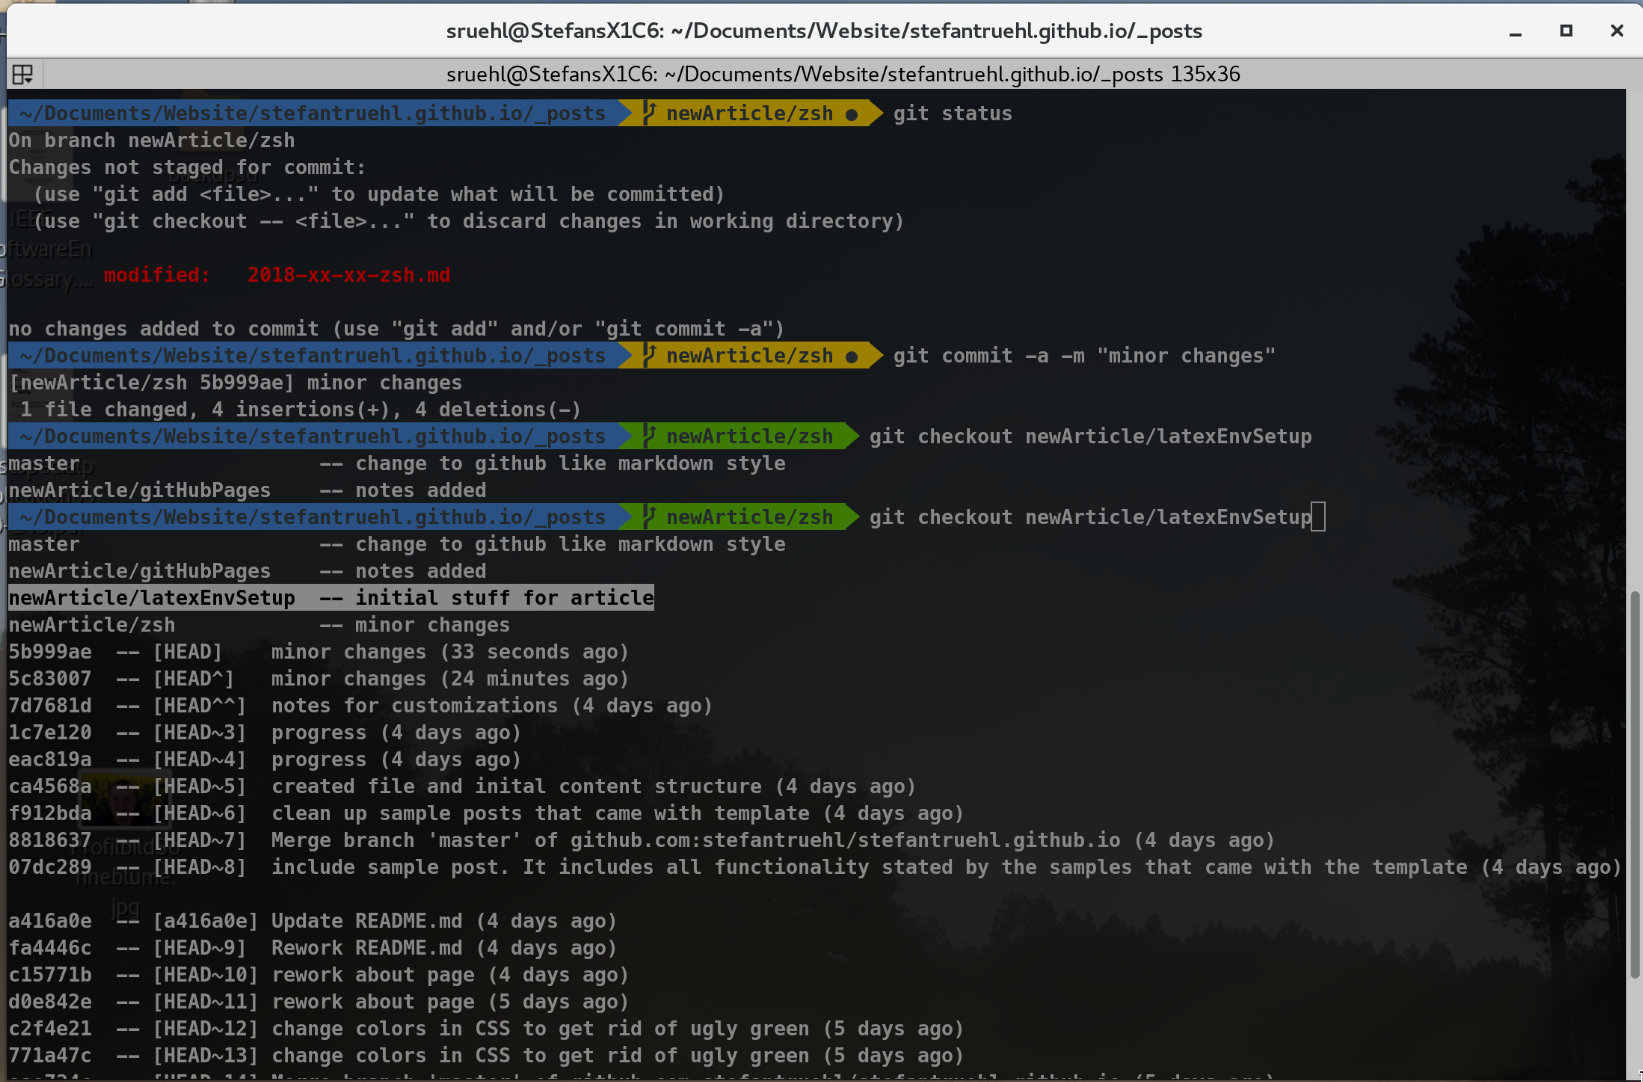
Another great example for awesome usability is the menu Zsh will give you if tab completion is not conclusive. In this menu you are able to select the right item using cursor keys. Illustrated by the figure above.
Customizability
Zsh offers great ability to be customized and extended. There is a wide variate of different plugins available that make tab completion even more powerful, for example by introducing completion for application parameters (illustrated by figure above) or extensive aliasing. Another awesome ability its theming. Zsh give great opportunity to be adjusted to your personal taste. The figure above illustrates the Agnoster theme, which comes along with Oh My Zsh.
Install Zsh
How to install Zsh on your system is quite specific to the OS you are using. During playing around with Zsh I have come across a nice installation guide you may want to review.
If you want to make Zsh your default shell on Linux systems, you only need to execute the following command:
chsh -s /bin/zsh
Even though Zsh offers great extensibility and customizability, I don’t want to spend the time of doing it myself, instead I use resources that are offered by configuration frameworks. So far I have tested two configuration framework for Zsh Prezto and Oh My Zsh. The following are a brief introductions to both.
Prezto — “Instantly Awesome Zsh”
Prezto is a nice configuration framework for Zsh. It enriches the shell with a variety of different defaults, aliases, functions, auto completion, and prompt themes.
I have used it for some time and enjoyed it. You may want to give it a shot and try it out.
Install Prezto
You will find a description on how to install Prezto on the project’s GitHub page. I strongly suggest to stick to this how to.
In my case it was rather simple as I had a vanilla installations of Zsh (running on my Fedora 27 installation). So I simply executed the following steps:
Step 1: Launch Zsh
zsh
Step 2: Clone the repository
git clone --recursive https://github.com/sorin-ionescu/prezto.git "${ZDOTDIR:-$HOME}/.zprezto"
Step 3: Create a new Zsh configuration by copying the Zsh configuration files provided:
  setopt EXTENDED_GLOB
  for rcfile in "${ZDOTDIR:-$HOME}"/.zprezto/runcoms/^README.md(.N); do
    ln -s "$rcfile" "${ZDOTDIR:-$HOME}/.${rcfile:t}"
  done
Step 4: Set Zsh as your default shell:
chsh -s /bin/zsh
Step 5: Open a new Zsh terminal window or tab.
Uninstall Pretzo
At some point I wanted to change to another configuration framework. Thus, I had to uninstall Pretzo. This is what I did to do so.
Step 1: Remove all the related .z* files and directories in $HOME directory. Im my case these were the directories:
- .zprezto
- .zcompcache
and files: .zcompdump, .zcompdump.zwc, .zhistory, .zlogin, .zlogout, .zpreztorc, .zprofile, .zshenv, .zshrc. You might want to keep some of them, e.g. hold on to your history.
Step 2: Change your default shell back to Bash (adjust to your default shell)
chsh -s /bin/bash
Oh My Zsh - “Your terminal never felt this good before”
Oh My Zsh is the configuration framework that I am currently using. According to the project’s website, they offer more than 200 plugins and more than 120 themes. For more infos review the following:
Install Installing Oh My Zsh
Instructions on how to install Oh My Zsh can be found on the GitHub page of the project. I chose the installation via curl which is a single command:
sh -c "$(curl -fsSL https://raw.githubusercontent.com/robbyrussell/oh-my-zsh/master/tools/install.sh)"
My current Configuration
The following are some configurations that I made.
Plugins
Activating plugins is quite easy with Oh My Zsh. You only need to edit the .zshrc configuration file and add the plugins’ names at the right spot. I am still in the trying-out phase. At the moment those are the ones I am using (snippet from .zshrc):
plugins=(
  git
  svn-fast-info
  docker
  sudo
  dnf
)
Well, from the names it should be obvious what the plugins are about, git adds awesome support for git, etc. However, there is one that I want to point out specifically: sudo. This plugin adds sudo in front of a console line once you hit the escape key twice. This is awesome because is significantly increases productivity.
Theme
After browsing the available themes for some time I chose agnoster as my favorit. The following describes how I got it working.
Step 1: Adjust .zshrc
Activating the agnoster theme can simply be done by changing the chosen theme in the .zshrc configuration file. It looks like this:
ZSH_THEME="agnoster"
Step 2: Install Powerline Fonts
The Agnoster theme relies on the Powerline Fonts. They need to be installed on your system.
In my case, using Fedora, I installed them in the following way:
# clone
git clone https://github.com/powerline/fonts.git --depth=1
# install
cd fonts
./install.sh
# clean-up a bit
cd ..
rm -rf fonts
Step 3: Make your Terminal Emulator use a Powerline Font
After installation, you need to make your terminal emulator use a powerline font. I use Terminator as terminal emulator. If you do too, open the preference menu (right-click -> Preferences). Under Profiles you should find the General tab with the possibility to change the font.
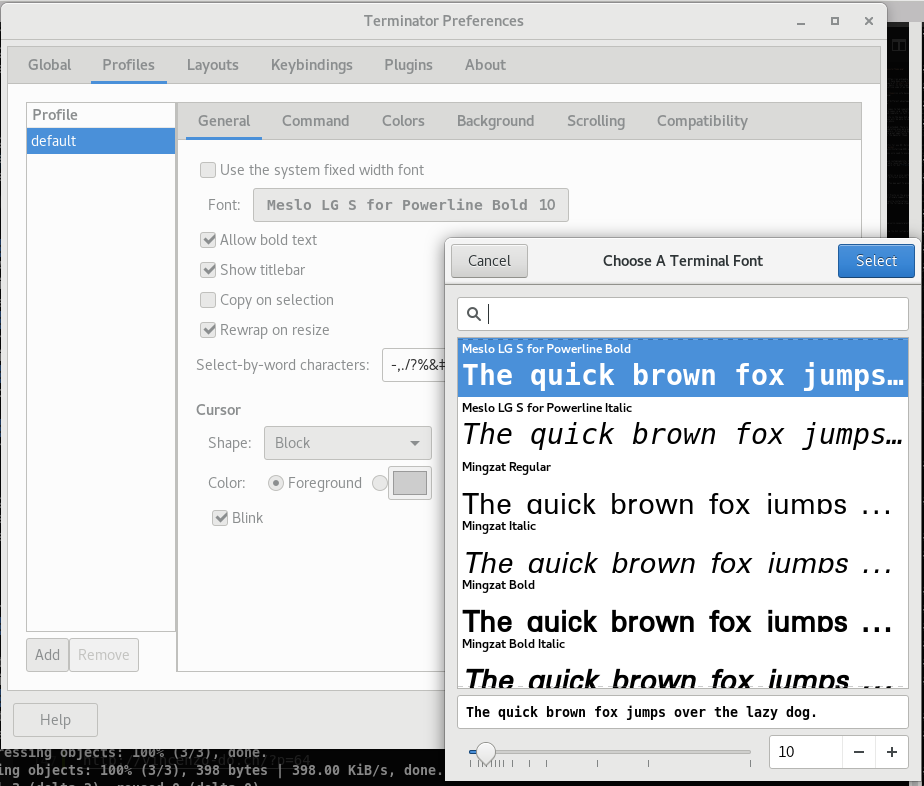
For other terminal emulators (e.g. gnome-terminal) it should be quite similar.
Step 4: Get rid of UserName@MachineName
At this point I still had sruehl@stefansX1C6 (my username and machine name) in front of the command prompt. This takes away valuable space. Thus, I wanted to get rid of it. Which I did by adding the following line to the .zshrc configuration file:
DEFAULT_USER="$USER"
After exectuing these steps. I ended up with the themeing that you see in the screenshot at the head ot the page.